3D Modeling - Exercises
28/08/2023 - 02/10/2023 // (Week 1 - Week 6)
Denise Anjali // 0342430
3D Modeling // Bachelor of Design in Creative Media
Exercises
LECTURES
Week 1: Module Briefing
First four weeks are exercises, each worth 5%. Starting with model blocking first - beginning with creating primitive objects such as cube, sphere and cylinder. What we see on the computer is the raw image, however, blender has a preview render then leading to more advanced rendering which uses CPU/GPU. Next exercise would be cylindrical modeling, to create anything with a cylindrical shape such as marker pens and bottles. After that is box modeling, objects based on cubes with variances. This step also includes EEVEE which is real times rendering. Examples include Unreal Engine and Unity. Lastly, boolean modeling is combining 2 shapes to create a new shape, whether it is union, intersection or difference. Similar to pathfinder tool in PS and AI. Ensure that surface is smoothed and has lighting, shadows and a good composition. Focus on simple modeling and simple rendering. Avoid exceeding course expectations and stick to the lesson parameters. Submissions only require a single image. Make sure to track progress on e-portfolio.
First project is modeling hard surface objects. Adding texture to the model
and combining the previous knowledge. This must be higher quality than the
exercises. Make sure that it is detailed enough. 2nd project is theme based
scene modeling , creating a sort of diorama of a location concept. The final
project is character modeling. This is the most difficult part of 3D modeling,
rigging included if time permits.
Week 2: Primitive Modeling
We were briefed on exercise 1 and the expectations for it. From there, we were shown demonstrations on object management (naming in outliner), mirroring an object to the 3D cursor, object hierarchy (parent and child relationship) and how to duplicate as an instanced group. As necessary for the exercise, we were also shown how to apply various modifiers, materials for colour and texture, how to adjust shadows and lighting, and finally, how to create the final render image.
Week 3: Cylindrical Modeling
This week's modeling technique was polygon and curved bas modeling. A polygon comprises of vertexes, edges and faces which can be manipulated in edit mode. Some of the tools we learnt in edit mode are inset, extrude, bevel and loop cut.
Inset - Create an inset on the selected face.
Extrude - To extend the face
Bevel - To add more faces on an edge in order to curve it out.
Loop cut - Cut lines in order to create a smoother or sharper look.
Week 4: Box Modeling
This week our goal was to create an object based on a box/cube shape. We can combine with other shapes but the base shape must be cubic.
Week 5: Organic Modeling
Boolean modifier/ add on:
Add/Union - Combines the intersection and creates one shape.
Intersection - Results in only the intersection
Difference - Depending on the selected shape, the remaining excluding the intersected will remain.
Knife tool creates edges.
INSTRUCTIONS
Exercise 1: Primitive Modeling
This exercise requires a model that is made of a combination of primitive shapes. Do not use components such as edges or vertexes. We are only to use workbench and the bevel, array, subdivision, and simple deform modifiers.
Pokemon, particularly the cute ones, are typically made up of simple shapes. I saw the socks I had and thus chose to attempt to recreate Mimikyu, the ghost/fairy type Pokemon.

FEEDBACK
Week 3
General feedback: Avoid seeing the empty background, use planes to fill.
Specific feedback: Good use of overlapping shapes for the eyes. Try using smooth shade and turn off outlines for a more seamless look. Lighting should be added and avoid using such contrasting colour for the background.
Week 4
General feedback: Avoid having a tight composition with the object being overlarge in frame. Be aware of the space around the object and the angle of the camera.
Week 5
General feedback: Avoid overlapping surfaces in the same position. Does not create a clean image and cause issues in high resolution render. Play around with the cavity setting for a more defined final look.
Week 7
Specific feedback: Issue with the karambit model causing the surface to look uneven. Separately model parts of the object rather than having it all in one mesh. Mesh > selection > separate. Minimise the number of edges and triangles close to each other, makes it messy and can cause issues with smoothing. Avoid the use of bevel on one edge and care to make the topology clean and neat.
Week 2: Primitive Modeling
We were briefed on exercise 1 and the expectations for it. From there, we were shown demonstrations on object management (naming in outliner), mirroring an object to the 3D cursor, object hierarchy (parent and child relationship) and how to duplicate as an instanced group. As necessary for the exercise, we were also shown how to apply various modifiers, materials for colour and texture, how to adjust shadows and lighting, and finally, how to create the final render image.
Week 3: Cylindrical Modeling
This week's modeling technique was polygon and curved bas modeling. A polygon comprises of vertexes, edges and faces which can be manipulated in edit mode. Some of the tools we learnt in edit mode are inset, extrude, bevel and loop cut.
Inset - Create an inset on the selected face.
Extrude - To extend the face
Bevel - To add more faces on an edge in order to curve it out.
Loop cut - Cut lines in order to create a smoother or sharper look.
Week 4: Box Modeling
This week our goal was to create an object based on a box/cube shape. We can combine with other shapes but the base shape must be cubic.
Week 5: Organic Modeling
Boolean modifier/ add on:
Add/Union - Combines the intersection and creates one shape.
Intersection - Results in only the intersection
Difference - Depending on the selected shape, the remaining excluding the intersected will remain.
Knife tool creates edges.
INSTRUCTIONS
Exercise 1: Primitive Modeling
This exercise requires a model that is made of a combination of primitive shapes. Do not use components such as edges or vertexes. We are only to use workbench and the bevel, array, subdivision, and simple deform modifiers.
Pokemon, particularly the cute ones, are typically made up of simple shapes. I saw the socks I had and thus chose to attempt to recreate Mimikyu, the ghost/fairy type Pokemon.

Image 1.1: Mimikyu Pokemon figurine, Week 2 image link
I found the image online and used it as a reference for what the creature
looked like.

Image 1.2: Body base shape, Week 2

Image 1.2: Body base shape, Week 2
Starting with the body, I layered a cylinder and a torus (created
using subdiv surface and simple deform - taper) and one flat cylinder
to create an egg-like shape with a flat base.


Image 1.3: Shaping the head and ears, Week 2
I created the head, the crease in the neck area, and the ears
using similar methods as above. The head is a cube after taper
deform and bevel modifiers. The ears gave me a bit of trouble as
they took a lot of trial and error of the deform and scale of the
cones and cylinders that form them. Using the quad view helped me
make sure that they were in the right places angled correctly. I
could have made them in a better way that doesn't look as
disproportionate to its overall size but I moved on due to time
limitations.
The triangular shape seen in the above image was part of my struggles with shaping the flares at the bottom of the creature. Initially, I tried to use the array modifier to create it but it kept becoming warped. Even after following tutorials to try and make a simple circle failed so I moved on from that method.

Image 1.4: Flares at base of Mimikyu, Week 2
I simply resorted to arranging the flares individually. This
took some time.

Image 1.5: Creating the facial features, Week 2
Mimikyu's face is a mimicry of how a normal Pokemon would look so it is made of scribbles. To achieve a similar effect only using the simple shapes that we had access to, I turned a cube into a flat strip. Applying transformation on it then using the bend deform modifier created the thin, somewhat flat circles that make up the eyes. This worked better than a torus which cannot scale its inner diameter using the scale tool.

Image 1.6: Mimikyu colour palette from Tumblr, Week 2
The last step was to add colours and frame the model
for the final render image. I used the colour palette
in the image above which included their hex codes. I
added a flat cube model as a base and coloured it
purple, after the Ghost type colour. Below are the
final render images in HD 720p from this
exercise.

Image 1.7: Solid render image, Week 2


Image 1.7: Solid render image, Week 2
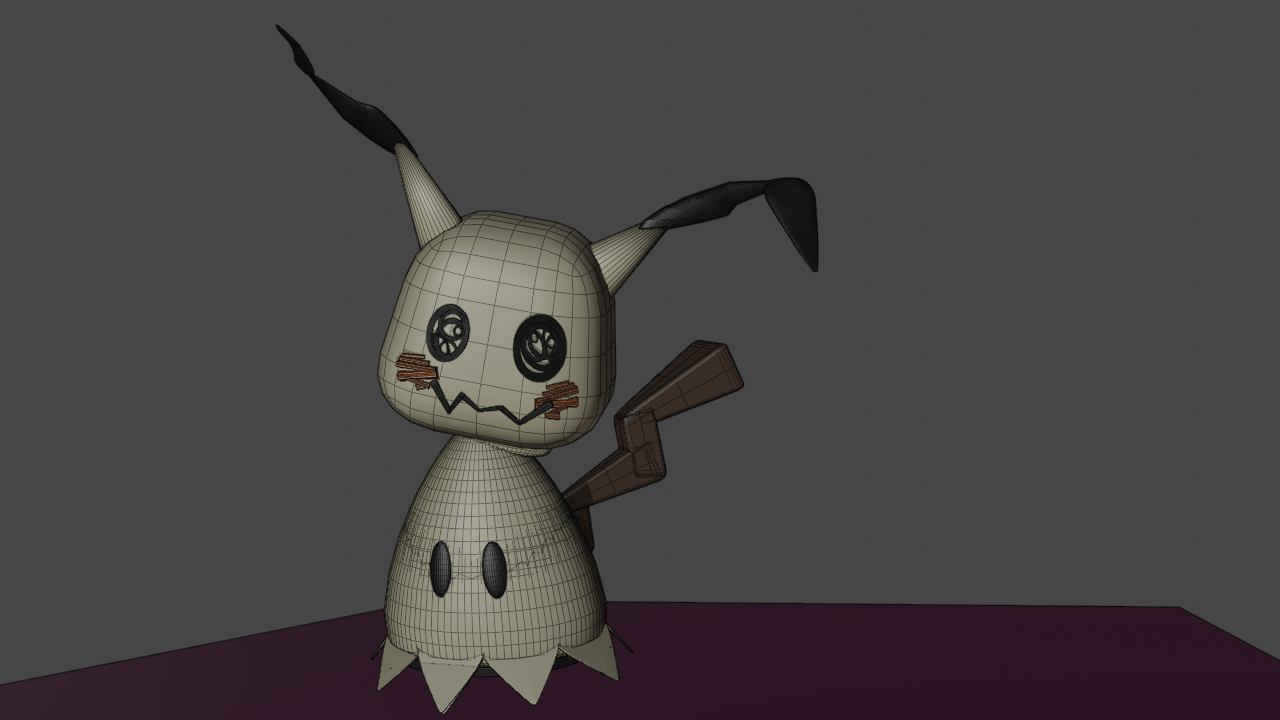
Image 1.8: Solid render with wireframe,
Week 2
I also added the shade smooth tool to see the
difference it could make and found that it made it better. I also found out later
that turning off outlines could make the
overlapping objects look smoother.


Image 1.9: Solid with smooth shade
effect, Week 2
Exercise 2: Cylindrical Modeling
The 2nd exercise allowed us to explore the edit mode on Blender. After a demonstration of a few tools (extrude, bevel, inset and loop cut), we were told that this week required us to make cylindrical objects. The goal was to make the shapes and smoothen it out well, as well as to have a good composition of objects.
While I had several themes and ideas, I eventually settled on a junk food theme as I found that they had various versions of cylinders in their packaging. I found front facing images as best as I could to use as my references. Initially, I stuck to creating the models using 8 sided cylinders. This made it easier to shape the details of the objects.

Image 2.1: Coke bottle rough model, Week 3

Image 2.2: Strawberry drink with straw rough model, Week 3

Image 2.3: Ramen cup rough model, Week 3

Image 2.4: Yogurt drink rough model, Week 3
In order to round out the composition, I wanted to create something that would not be placed vertically. The ice pops were simple enough though adjusting the proportions of the top half took some time.

Image 2.5: Ice pop rough model, Week 3
The 2nd exercise allowed us to explore the edit mode on Blender. After a demonstration of a few tools (extrude, bevel, inset and loop cut), we were told that this week required us to make cylindrical objects. The goal was to make the shapes and smoothen it out well, as well as to have a good composition of objects.
While I had several themes and ideas, I eventually settled on a junk food theme as I found that they had various versions of cylinders in their packaging. I found front facing images as best as I could to use as my references. Initially, I stuck to creating the models using 8 sided cylinders. This made it easier to shape the details of the objects.

Image 2.1: Coke bottle rough model, Week 3
While the main body of the strawberry drink was fairly simple, the lid and straw were somewhat detailed and had more interesting shapes. I also ensured that the straw was hollow by turning off n-gon in the intial settings.

Image 2.2: Strawberry drink with straw rough model, Week 3
The ramen cup lid led me back to the basics of modeling from the previous week. I also discovered how to utilise the spin tool in edit mode to create the pattern on the ramen cup. Although it is difficult to notice in the image below, a pair of chopsticks were also modelled to go with the cup noodles.

Image 2.3: Ramen cup rough model, Week 3
The challenge of the yogurt drink was mostly in getting the proportions to look right. There were also some subtle curves in the shape of the design which required a bit of zooming in.

Image 2.4: Yogurt drink rough model, Week 3
In order to round out the composition, I wanted to create something that would not be placed vertically. The ice pops were simple enough though adjusting the proportions of the top half took some time.

Image 2.5: Ice pop rough model, Week 3
Moving on to composition and colouring. I hid all the reference images and moved all the models around until I felt that it was satisfactory. I also learnt how to select individual faces in order to colour them different colours.

Image 2.6: Colouring process, Week 3

Image 2.7: After smoothing the shapes, Week 3

Image 2.6: Colouring process, Week 3
I smoothed out the models after colouring in order to decrease the number of faces selected while colouring. While some models were smoothened using the subdivision modifier, others used the bevel tool. I also used smooth shape on most surfaces so long as their surfaces did not end up distorted.

Image 2.7: After smoothing the shapes, Week 3
For the final simple render, I played around with the studio materials and lighting and decided on a shiny material as plastic and glass tended to be shiny. I also remembered to turn off outlines this time and adjust the shadows a little.

Image 2.8: Final render image, Week 3

Image 2.9: Final render image with wireframes, Week 3

Image 2.8: Final render image, Week 3

Image 2.9: Final render image with wireframes, Week 3
Exercise 3: Box Modeling
This exercise is similar to the previous with the exception that the object has to be cubic in shape this time around. The object I chose to model this time around was a laundry machine. I found these images from Pinterest and chose it for the machine's simple design with a few extra features.


This exercise is similar to the previous with the exception that the object has to be cubic in shape this time around. The object I chose to model this time around was a laundry machine. I found these images from Pinterest and chose it for the machine's simple design with a few extra features.

Images 3.1 & 3.2: Laundry machine reference images from Pinterest, Week 4
I started with the main body of the machine and the overall look of it, including cavities and indents. Then I added another mesh within edit mode for the door.

Image 3.3: Rough machine base model, Week 4

Image 3.4: Rough door base model, Week 4

Image 3.3: Rough machine base model, Week 4

Image 3.4: Rough door base model, Week 4
Then I started on some of the details that made up the machine such as the hinges and sink pipe. Due to the quality of the reference image, some details weren't clear so it may not be as accurate. The pipe gave me a little trouble but creating a new mesh in object mode allowed for more modifiers to be applied and the pipe came together after.

Image 3.5: Hinge model, Week 4

Image 3.6: Pipe modeling, Week 4

Image 3.5: Hinge model, Week 4

Image 3.6: Pipe modeling, Week 4
For the last details of the machine, the washing chute and the toggles etc, I used individual objects to model them in order to ensure that the details could be seen.

Image 3.7: Machine features modeling, Week 4

Image 3.7: Machine features modeling, Week 4
Additionally, I created a laundry basket to add to the composition and started adding colours to all the models. Given that some of the components were exposed metal, I increased the metallic quality of those surfaces. After adding colours, I smoothed out the relevant edges and components.

Image 3.8: Composition of objects, Week 4

Image 3.9: Adding colour to the models, Week 4

Image 3.8: Composition of objects, Week 4

Image 3.9: Adding colour to the models, Week 4
Finally, all that was left was to compose the view in the camera's eye and adjust the lighting as necessary for a good composition.

Image 3.10: Composing the viewport render image, Week 4

Image 3.11: Final render image with wireframe, Week 4

Image 3.12: Final render image, Week 4

Image 3.10: Composing the viewport render image, Week 4

Image 3.11: Final render image with wireframe, Week 4

Image 3.12: Final render image, Week 4
Exercise 4: Karambit Modeling
This exercise requires us to imitate the image given to us and create a karambit. The challenge would be to mimic the sharpness of the blade as well as the details of its shape. Below is the reference image given to us.

Image 4.1: Karambit reference image, Week 5
This exercise requires us to imitate the image given to us and create a karambit. The challenge would be to mimic the sharpness of the blade as well as the details of its shape. Below is the reference image given to us.

Image 4.1: Karambit reference image, Week 5
We were given a practical tutorial on how to craft the basic shape of the handle and blade of the knife. Following those steps, I first created the base.

Image 4.1: Creating the handle process, Week 5

Image 4.1: Creating the handle process, Week 5
Then, moving onto the blade. We created one half of the blade first as it is a symmetrical part of the object. This required a lot of careful adjustment. After that, it was mirrored using the mirror modifier. and further adjusted to create a smooth, complete blade.

Image 4.3: Creating half the blade, Week 5

Image 4.4: Mirroring the blade, Week 5

Image 4.3: Creating half the blade, Week 5

Image 4.4: Mirroring the blade, Week 5
From there, it was a matter of adjusting details to create a sharper edge for certain lines. I also added the leather and screws details onto the handle of the karambit. I also used the newly learnt boolean tool to create the cross indent on the surface of the screw. I also added some colour and texture to the karambit.

Image 4.5: Adding details to the blade, Week 5

Image 4.5: Adding details to the blade, Week 5
Finally, it came time to viewport render and I set up a backdrop for the knife using planes as usual. I also changed the material of the entire model and adjusted the shadows and camera angle.

Image 4.6: Final render set-up, Week 5

Image 4.6: Final render set-up, Week 5
Here are the final rendered images which were submitted.

Image 4.7: Final karambit render image, Week 5


Image 4.7: Final karambit render image, Week 5

Image 4.7: Final karambit render image with wireframe, Week 5
FEEDBACK
Week 3
General feedback: Avoid seeing the empty background, use planes to fill.
Specific feedback: Good use of overlapping shapes for the eyes. Try using smooth shade and turn off outlines for a more seamless look. Lighting should be added and avoid using such contrasting colour for the background.
Week 4
General feedback: Avoid having a tight composition with the object being overlarge in frame. Be aware of the space around the object and the angle of the camera.
Week 5
General feedback: Avoid overlapping surfaces in the same position. Does not create a clean image and cause issues in high resolution render. Play around with the cavity setting for a more defined final look.
Week 7
Specific feedback: Issue with the karambit model causing the surface to look uneven. Separately model parts of the object rather than having it all in one mesh. Mesh > selection > separate. Minimise the number of edges and triangles close to each other, makes it messy and can cause issues with smoothing. Avoid the use of bevel on one edge and care to make the topology clean and neat.


Comments
Post a Comment