3D Modeling - Final Project
23/10/2023 - 01/12/2023 // (Week 9- Week 14)

Denise Anjali // 0342430
3D Modeling // Bachelor of Design in Creative Media
Final Project: Character Modeling
INSTRUCTIONS
Final Project Character Modeling
The character I chose to model is Peridot from the Steven Universe series. She is a rather geometric character as her design is meant to reflect her nature as a gemstone.

Image 1.1: Peridot from Steven Universe
I used this model sheet sourced from the Steven Universe fandom wiki as my reference for the character.

Image 1.2: Model sheet of Peridot
I cropped and arranged the 3/4 facing, side facing and back facing views of the model in blender as my references. Though the inconsistent poses were difficult to reference, they were all relatively similar and I could use them primarily to ensure that I did not stray too far off proportions.
I started with modeling the general shape of the character, starting with the head.

Image 2.1: Modeling the shape of the head
 Image 2.2: Modeling the shape of the torso, arms and fingers

Image 2.3: Modeling the leg and foot shape
I started with modeling the general shape of the character, starting with the head.

Image 2.1: Modeling the shape of the head

I ran into trouble when modeling the bottom half of the character, specifically the knee. There is a diamond shape that forms the knee which was difficult to manipulate as I only realised it was there after creating the entire leg. Still, I managed to model the leg according to the references in the end and duplicated it by using the mirror modifier.

Image 2.3: Modeling the leg and foot shape
After the overall shape, it came time to add additional details and the facial features of the character. I stuck to mostly using more meshes for the facial features but used the knife tool to carve the details of the torso.

Image 2.4: Adding facial features and modeling the mouth

Image 2.4: Adding facial features and modeling the mouth
The last thing to model was the glass mask which covers half of her face. I knew I would be texturing it to be transparent so for now I modelled a separate mesh according to its shape and size onto her face.

Image 2.5: Modeling the maskWhen it came time for materials and colours to be added, the clear sections for each colour made it easy to do so.

Image 2.6: Coloured low poly character model

Image 2.5: Modeling the mask

Image 2.6: Coloured low poly character model
However, when it came time to smoothen out the model using subdivision modifier, I ran into the issue of warped colours and edges. With more sculpting using the knife tool and loop cut tool to straighten edges and push colours back into place, I managed to fit the model back into its initial view.

Image 2.7: Subdivided character model

Image 2.7: Subdivided character model
Using a tutorial I found on YouTube, I made the mask on her face glass-like.

Image 2.8: Shading the mask material into glass

Image 2.8: Shading the mask material into glass
Finally came time to add lighting and render the model. I mostly used sun lights for lighting and added a backdrop for the character. I stuck with using eevee throughout the materials and rendering process as I felt that the shadows looked better than in cycle.

Image 2.9: Lighting the model for rendering
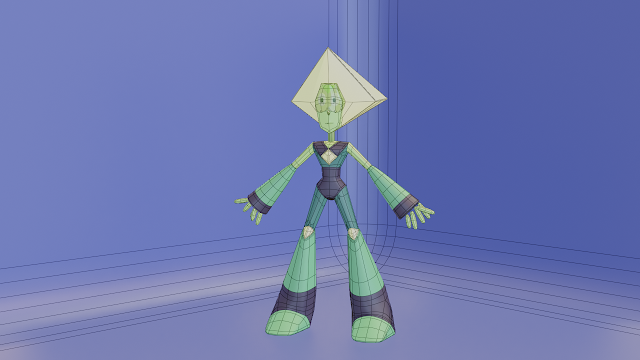 Final rendered character model with wireframe
 Final rendered character model in eevee

Image 2.9: Lighting the model for rendering


FEEDBACK
Specific feedback: The character looks good overall (as of the modeling phase). The inside of the mouth should be modelled as well.


Comments
Post a Comment